How to Plan a Free Day in Orlando Without Hidden Costs
When people search for things to do in Orlando for free, they usually aren’t looking for the longest list of attractions. They’re trying to build a day that’s enjoyable, affordable, and easy to manage.
Most visitors are trying to solve one or more of these problems:
- Enjoy a full day without feeling like they’re settling for “cheap.”
- Avoid hidden costs such as parking fees, unnecessary driving, and impulse spending.
- Create a plan that still works in Florida’s heat, afternoon rain, and heavy traffic.
- Find family-friendly places where children can enjoy themselves without constant extra expenses.
TripsCity Insight: In Orlando, a successful free day isn’t about finding more attractions—it’s about connecting the right ones into one smooth itinerary.
The Cluster Plan: Explore Orlando Without Wasting Time Driving
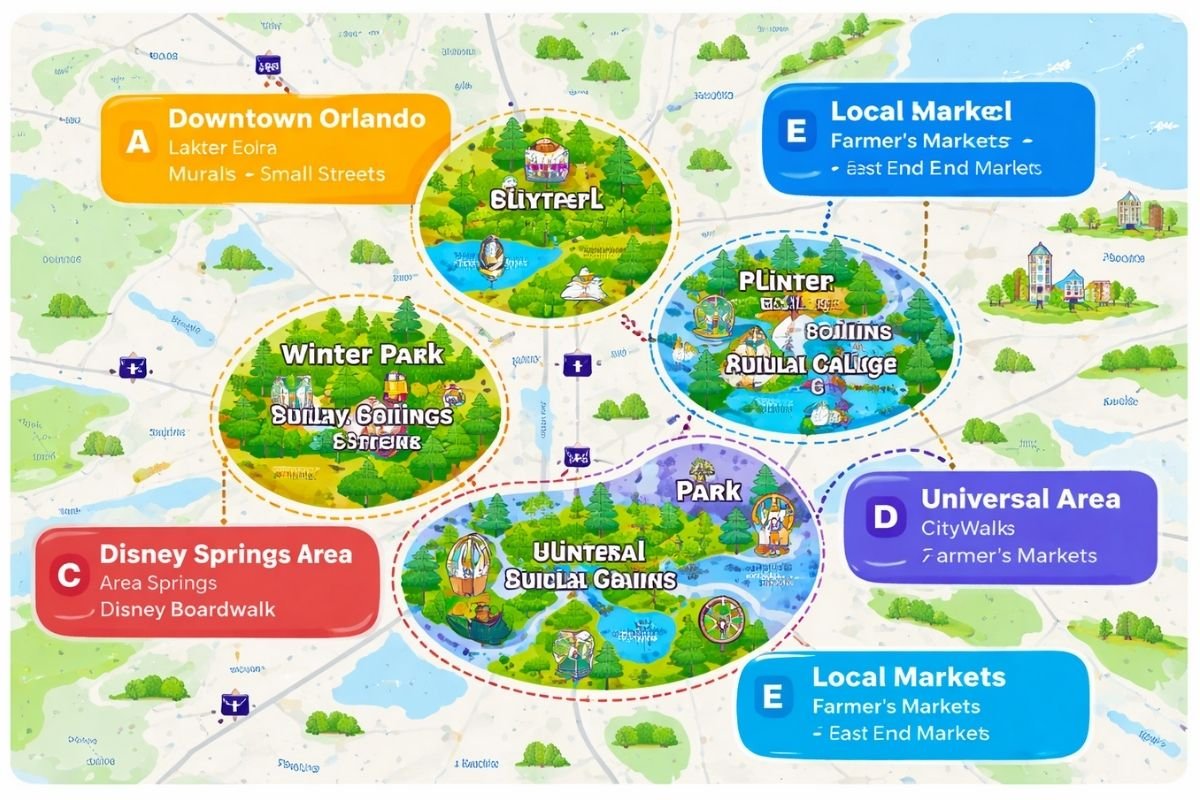
Orlando gets cheaper and easier when your “free things” live inside a controlled radius — not one scattered list.
Unlike many destinations, Orlando doesn’t have one central area where every attraction is within walking distance. The city’s most popular free experiences are spread across different neighborhoods, which is why visiting too many places in one day often creates more stress than value.
To make planning easier, this guide groups attractions into five practical clusters. Each one lets you enjoy nearby experiences while reducing unnecessary driving, parking costs, and wasted time.
- Cluster A – Downtown Orlando: Lake Eola Park, murals, and downtown streets.
- Cluster B – Winter Park: Park Avenue, Rollins College, and scenic lakeside walks.
- Cluster C – Disney Area: Disney Springs and nearby free experiences.
- Cluster D – Universal Area: Universal CityWalk and its surrounding entertainment district.
- Cluster E – Markets & Local Experiences: Community markets, neighborhood events, and local atmosphere.
TripsCity Tip: Spending one full day in a single area almost always delivers a better experience than trying to visit multiple districts across Orlando.
3 Simple Rules for Planning a Free Day in Orlando
Finding free attractions is easy. Planning them efficiently is what saves you both time and money.
Rule #1 — Stay within one area.
Choose one main district instead of driving across Orlando multiple times.
Rule #2 — Check parking before you leave.
Free admission doesn’t always mean free parking, especially around major entertainment areas.
Rule #3 — Leave room for flexibility.
Florida weather, traffic, and tired legs can quickly change your plans, so always leave time for unexpected delays.
Parking Decision Guide
Parking-sensitive day: Choose Downtown Orlando or Winter Park, but check the specific garage, lot, or street-parking rules before you leave. Once parked, keep the rest of the itinerary within walking distance.
Entertainment-district visit: Disney Springs and Universal CityWalk can both work as free-entry stops, but check current parking conditions before visiting and decide in advance how much you are willing to spend on food, shopping, or entertainment.
No car: Choose one walkable district and avoid combining attractions on opposite sides of Orlando, since multiple rideshare trips can quickly erase the savings of a free itinerary.
TripsCity Tip: A place can have free admission without creating a zero-cost day. Check transportation and parking first, then build the itinerary around one compact area.
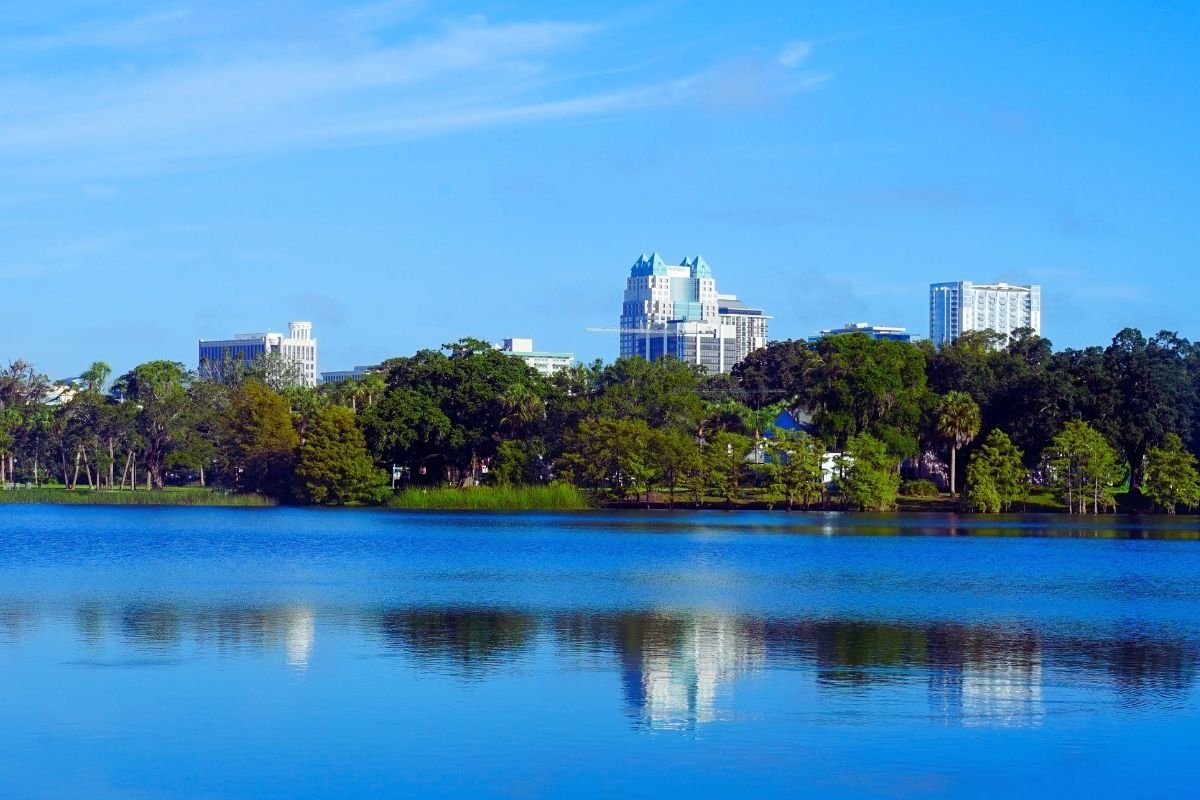
Cluster A: Downtown Orlando (Lake Eola Park & Downtown Walks)
Downtown Orlando is one of the easiest places to enjoy a free day because several attractions are within a comfortable walking distance. Once you arrive, you can explore without constantly getting back into your car. If you’re planning a longer stay, our Complete Orlando Travel Guide explains how to organize Orlando’s neighborhoods into a practical multi-day itinerary while avoiding unnecessary driving.
Suggested Half-Day Itinerary: Lake Eola Park → one nearby street or mural walk → lunch break → one optional nearby stop if time and energy allow.
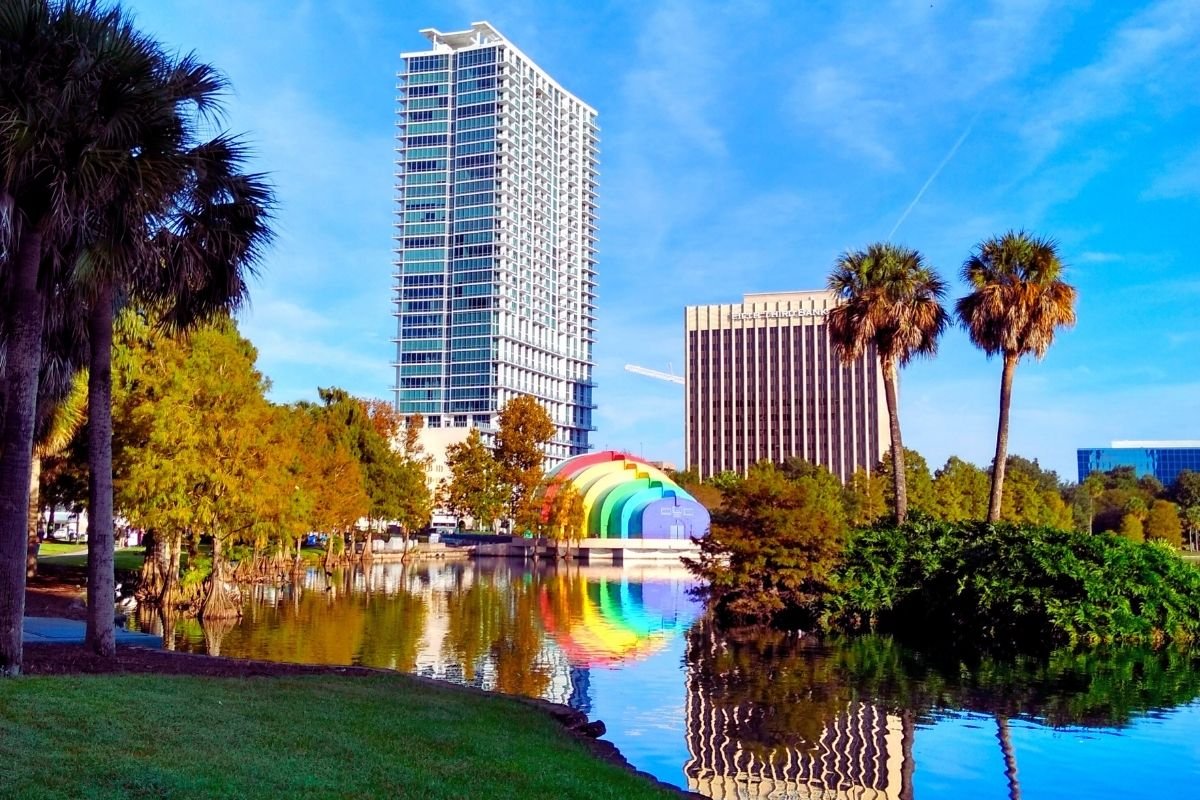
09:30 – 11:30 | Lake Eola Park (Your Free-Day Anchor)
The cleanest free Orlando day starts with one strong anchor you can run without driving repairs: a Lake Eola loop.
Why Visit Lake Eola Park? Lake Eola Park combines skyline views, walking paths, public art, and one of Orlando’s most relaxing outdoor spaces—all without an admission fee.
Recommended visit: 60–120 minutes.
TripsCity Tip: Complete the full lake loop before adding another stop. Most visitors lose time by leaving too early and driving somewhere else unnecessarily.
Hot weather tip: Visit earlier in the morning whenever possible, use shaded paths around the lake, and don’t hesitate to shorten the walk if temperatures begin affecting the rest of your itinerary.
11:30 – 13:00 | Choose One Nearby Downtown Add-On
After Lake Eola, add only one nearby activity so the morning stays walkable and easy to manage.
- Downtown murals and local streets: Best for photography and a quick look at the city beyond the lake. Allow about 30–60 minutes.
- Dickson Azalea Park: Best for a short green-space break close to Downtown.
- Lake Eola extension: Best when you would rather stay in the same area than move the car.
- Lake Baldwin Park: Consider it only when it fits naturally with the direction of your next stop.
- Skip the add-on: The smartest choice when the weather is hot, the group is tired, or lunch is already becoming the priority.
TripsCity Tip: Choose the option that adds variety without creating another driving problem.
13:00 – 14:00 | Take a Lunch and Cooling Break
A proper lunch break can prevent a free Orlando day from becoming unexpectedly expensive. When travelers become hungry, tired, or overheated, they are more likely to make unplanned purchases simply to stay comfortable.
Use this hour to eat, cool down, check the weather, and decide whether the afternoon still needs another stop. You do not have to fill every hour for the day to feel worthwhile.
14:00 – 16:00 | Choose a Flexible Downtown Finish
- Stay nearby: Repeat a short shaded walk or spend more time around Lake Eola.
- Add one close stop: Continue only when the next place is genuinely convenient and does not require crossing Orlando.
- Finish early: Save your energy and budget for the evening or the following day.
Cluster B: Winter Park (Park Avenue + Scenic Calm)
Winter Park offers one of the most relaxing free experiences near Orlando. With tree-lined streets, lakeside scenery, and the charming atmosphere of Park Avenue, it’s an ideal choice for travelers looking to slow down without spending money on major attractions.
Unlike Downtown Orlando or the theme park districts, Winter Park rewards visitors who explore on foot. Once you arrive, you can comfortably enjoy the area without repeatedly getting back into your car.
Suggested route: Start with Park Avenue, continue to one nearby scenic stop such as Kraft Azalea Garden, Mead Botanical Garden, or the Rollins College area, then finish the afternoon at a relaxed pace.
09:30 – 12:00 | Park Avenue Stroll
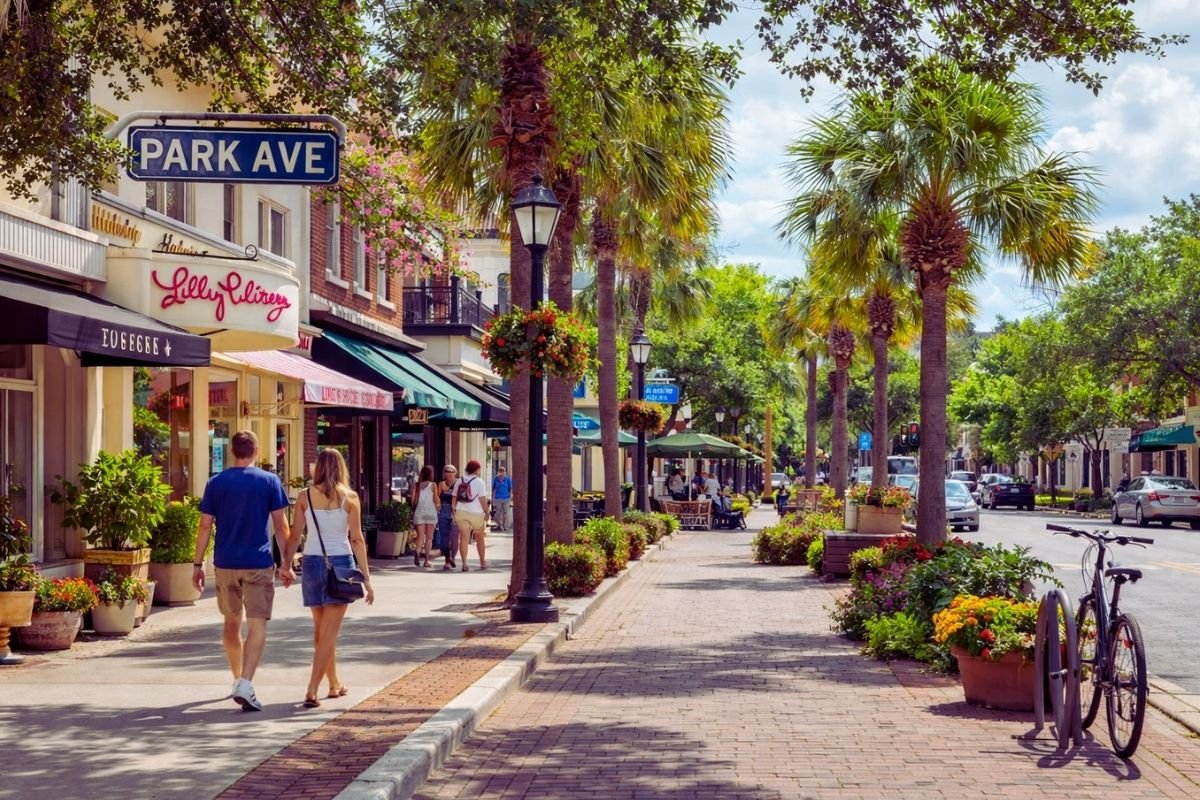
Winter Park works because the day stays walkable once you arrive. The mistake is turning it into a scattered driving day.
Park Avenue is the core of a free Winter Park itinerary. Its appeal comes from the combination of walkable streets, landscaped spaces, local architecture, shopfronts, and a slower atmosphere than Orlando’s major entertainment districts.
Recommended time: 90–150 minutes.
TripsCity Tip: Explore Park Avenue on foot and avoid turning Winter Park into a quick stop between two distant Orlando districts. The relaxed pace is part of the experience.
12:00 – 13:30 | Choose One Scenic Winter Park Add-On
- Kraft Azalea Garden: Best for a short lakeside visit and quiet scenery.
- Mead Botanical Garden: Best for shaded paths, greenery, and a longer nature break.
- Rollins College area: Best for architecture, campus scenery, and an easy continuation from Park Avenue.
- Skip the add-on: Best when Park Avenue already feels like a complete morning or the weather is becoming uncomfortable.
Quick decision: Choose Kraft Azalea Garden for scenery, Mead Botanical Garden for shade, and Rollins College for the easiest walking continuation.
13:30 – 15:30 | Slow Down and Enjoy the Area
Use the final part of the afternoon to enjoy Winter Park at a relaxed pace. If you’ve already explored Park Avenue and one nearby attraction, there is little value in driving across Orlando just to add another stop.
Finishing the day here usually creates a better overall experience than squeezing in one more attraction. A slower pace often leaves you with more energy for the following day while keeping transportation costs low.
TripsCity Tip: Winter Park rewards visitors who slow down. Resist the temptation to add another distant attraction just to fill the schedule.
Cluster C: Disney Area (Disney Springs — Free Entry, Strict Rules)
Suggested visit: Arrive in the late afternoon, enjoy one relaxed walk around Disney Springs, take in the atmosphere, and leave before shopping or dining becomes the main reason to stay.
Recommended approach: Treat Disney Springs as a short sightseeing stop rather than an all-evening activity. Keeping the visit focused helps preserve both your budget and your energy.
Disney Springs is free to enter, but a free visit still requires a little planning. Restaurants, shopping, and entertainment can quickly turn a budget stop into one of the most expensive parts of your day if you arrive without a plan.
For many visitors, however, it’s one of the best places to enjoy Disney’s atmosphere without purchasing a theme park ticket. Waterfront walks, live entertainment, and themed streets make it an excellent late-afternoon or evening stop.
Parking reality: Standard self-parking at Disney Springs is complimentary, but allow extra arrival time and check current parking availability before you go.
Official info: Disney Springs official site (check current hours & parking updates).
Spending rule: set a “no-buy window” for the first 60 minutes. Walk first, decide later.
Late Afternoon or Evening | 90–150 Minutes

Disney Springs works when it’s a controlled loop — not a spending drift disguised as a free day.
Best timing: Late afternoon into evening, when the atmosphere improves and the midday heat becomes less intense.
Why it works: Disney Springs provides waterfront walks, themed surroundings, and entertainment-district atmosphere without requiring a theme park ticket.
Watch for: Crowds, impulse spending, and the temptation to remain longer simply because you have not planned the next part of the day.
TripsCity Tip: Walk through the area before buying anything. If crowds begin slowing the visit or spending becomes the only reason to stay, finish the loop and leave.
Cluster D: Universal Area (CityWalk — Free Entry, Parking Reality)
Suggested visit: Plan for one short walk through CityWalk, enjoy the atmosphere, take a few photos, and leave before the visit turns into unnecessary spending.
Recommended approach: CityWalk works best as a brief stop while you’re already in the Universal area, not as a destination that fills an entire evening.
Universal CityWalk is best viewed as a short entertainment stop rather than a full-day destination. While entry is free, transportation, parking, restaurants, and entertainment can easily become part of the overall cost.
If you’re already visiting the Universal area, CityWalk is an enjoyable place for an evening walk, people-watching, and photographs without buying a park ticket.
Official info: Universal CityWalk official page (verify parking & hours).
Parking reality: CityWalk entry is free, but regular self-parking may be paid before 6:00 p.m. Complimentary self-parking after 6:00 p.m. may apply, although event-night restrictions can change the rules. Check Universal’s official parking page before visiting.
Short loop plan | 60–120 minutes
Best timing: evening (works best as a short atmosphere loop).
Exit trigger: the moment parking cost feels annoying or crowds slow your movement — take the win and leave.
Rule: one loop, one photo moment, then end it.
Parking rule: if parking costs would irritate you, skip this cluster entirely — that’s a smart budget decision.
Best Free Parks in Orlando for Shade, Walking, and Family Breaks
Orlando’s parks provide more than a free place to walk. They offer shade, open space, and low-pressure breaks that can keep a busy itinerary from becoming exhausting.
| Park | Best for | Suggested visit |
|---|---|---|
| Mead Botanical Garden | Shaded paths, nature, and a longer cooling break | 60–120 minutes |
| Kraft Azalea Garden | Lakeside scenery, photography, and a peaceful stop | 30–60 minutes |
| Dickson Azalea Park | A quick green-space break near Downtown | 30–60 minutes |
| Lake Baldwin Park | Open space and an uncomplicated outdoor walk | 60–90 minutes |
For families: Prioritize shade, bathrooms, open space, and an easy exit over choosing the park with the longest list of features.
For hot days: Choose the park that fits your existing route. A shorter shaded stop is usually more useful than adding another long drive across Orlando.
TripsCity Recommendation: Choose Mead Botanical Garden for a longer nature break, Kraft Azalea Garden for scenery, and Dickson Azalea Park for a quick reset near Downtown.
Cluster E: Markets & Local Texture (Scheduled + Tight Add-on)
Suggested visit: Explore one local market, combine it with one nearby attraction, and finish the day without crossing the city for additional stops.
Recommended approach: Markets are most enjoyable when they remain part of a compact itinerary rather than becoming an excuse for unnecessary driving.
Local markets offer a side of Orlando that many visitors never experience. They combine neighborhood atmosphere, local food, small businesses, and seasonal events without requiring an admission ticket.
Some farmers’ markets operate only on selected days, while East End Market follows regular daily hours. Always confirm the latest schedule before planning your itinerary around one.
09:30 – 12:00 | Market or Community Event
Recommended time: 90–150 minutes.
Choose one option based on the current schedule:
- Orlando Farmers Market (Lake Eola area; best “Downtown texture” when it lines up)
- Winter Park Farmers’ Market (walkable, calm, easy to run clean)
- Audubon Park Community Market (local feel, compact)
- East End Market (market-hall texture; best as a short time-capped stop)
Cut rule: if it’s crowded and slow, shorten the visit. Texture dies when you force it.
12:00 – 14:30 | Choose One Nearby Add-On
- Scenic walk: Best when the weather is comfortable and the route remains nearby.
- Park break: Best when the heat rises and you need shade or open space.
- Finish the day: Best when energy drops or the next stop would require unnecessary driving.
Free Things to Do in Orlando With Kids (No Chaos Version)

With kids, the “free day” works when it has shade, space, and predictable stops — not more driving.
Planning a free day with children is usually less about finding more attractions and more about creating a predictable routine. Parks, open spaces, and regular breaks often keep children happier than trying to visit multiple places in one day.
- Playground-first plan: one strong playground + one shaded walk loop + a calm finish.
- Lake loop plan: short lake walk + simple breaks + exit before meltdown time.
- Market plan: only if the schedule fits and you keep a strict time cap.
Named picks that usually work best:
- Lake Eola Park (easy loop + open space)
- Mead Botanical Garden (shade + calm paths)
- Lake Baldwin Park (space to move without pressure)
- Winter Park (Park Avenue) (short controlled stroll when you want “calm texture”)
Family rule: A successful free day is the day you end while everyone is still okay — not the day you squeeze in more.
Heat & Rain Swaps (So Weather Can’t Hijack Your Free Day)

Orlando weather doesn’t need a new plan — it needs a swap that doesn’t add distance.
Florida weather can change quickly, especially during the warmer months. Afternoon rain showers and high temperatures are common, so having a simple backup plan helps keep your day enjoyable without adding unnecessary driving.
Instead of searching for another attraction, the best approach is usually to shorten your route, stay close to your current area, and adjust your schedule around the weather. If you’re planning your trip during the warmer months, our guide to the best time to visit Orlando explains what to expect from the weather, crowds, and seasonal conditions throughout the year.
- Swap A (Heat spike): shorten the walk loop, move to shade, and turn the plan into a “two-block day” instead of forcing steps.
- Swap B (Rain hits): avoid adding a long drive just to stay “busy.” Choose a nearby short loop between rain windows.
- Swap C (Crowds rise): cut the optional add-on and end clean. A calm exit protects the next day’s energy.
Weather rule: If the swap requires crossing the city, it’s not a swap — it’s a new problem.
The Killer Mistakes (That Destroy Free Days in Orlando)
Mistake #1: Treating Orlando like it has one “center.”
It doesn’t. Scattered planning turns free time into driving time.
Mistake #2: Doing two far zones in one day “because both are free.”
Free entry doesn’t matter if you lose half the day in transit.
Mistake #3: Not deciding your parking reality up front.
Many “free entry” places still cost indirectly. Decide what you accept — then build the plan around it.
Mistake #4: Letting a free place become a spending drift.
The most expensive budget trip habit is solving discomfort with small purchases all day.
Mistake #5: Over-walking in heat, then repairing the day with driving.
That combo kills energy. Pick a shorter loop and protect the buffer.
The Direct Decision (No Soft Ending)
If you searched things to do in Orlando for free, you weren’t asking for “more ideas.”
You were asking for clarity: what’s actually worth doing, what’s truly low-cost in real life, and what structure prevents the day from leaking money and time.
So here’s the clean decision:
Pick ONE main free anchor day: Downtown (Lake loop + tight streets) or Winter Park (Park Avenue calm).
Then pick ONE controlled “big atmosphere” loop: Disney Springs or CityWalk — only if you accept the parking reality.
Then add ONE texture block: a scheduled market/event + one nearby add-on.
And every day: keep a buffer so heat, rain, or delays don’t force spending repairs.
Do that, and Orlando won’t feel like a budget compromise.
It will feel like a trip that stayed steady — because your free days were built as systems, not random lists.
FAQ: Things to Do in Orlando for Free
What are the best free things to do in Orlando?
The best free picks are a Downtown Lake Eola loop, a Winter Park Park Avenue stroll, and a scheduled local market or community event. These give a “real day” without ticket costs — as long as you keep the radius tight.
Are Disney Springs and CityWalk actually free?
Entry is free, but the real decision is parking and spending drift. They work best as short, controlled walk loops — not open-ended wandering.
What are free things to do in Orlando with kids?
Choose one strong park/playground loop with shade and predictable breaks. The key is ending the day while energy is still stable, not squeezing in more stops.
How do I avoid hidden costs on a “free day” in Orlando?
Decide your parking reality up front, keep one main area per day, and avoid crossing the city twice. Most “free” days become expensive through time waste and comfort spending.
What should I do in Orlando for free when it’s hot or rainy?
Run shorter loops, stay near shade, and swap without distance. The worst move is adding a long drive just to stay “busy.” Protect the buffer and end clean.