Free things to do in London (2026) in one line:
Pick ONE cluster (Westminster/South Bank, Kensington Museums, Covent/Soho, City, Parks, Greenwich), do ONE anchor + ONE add-on nearby + ONE exit trigger—so your “free day” doesn’t turn into paid transport and queues.
Disclosure: This guide may include optional booking links for convenience (hotel base, transport tools, eSIM, luggage storage). If you use them, we may earn a small commission at no extra cost to you.
Jump to:
The Shock Truth: “Free Entry” Is Not a Free Day
London doesn’t punish you with ticket prices.
It punishes you with movement.
The fastest way to ruin a “free day” is chasing free spots across the city like you’re collecting stamps.
Because the hidden bill arrives as:
- Transport taps (or long walking detours you didn’t budget energy for)
- Queue time (free places get crowded first, not last)
- Booking friction (some free viewpoints are free only if you secured a slot)
So yes—London has world-class free museums, parks, markets, and views.
But the city only becomes “free” when you stop treating it like a scattered list… and start treating it like a cluster plan.
The TripsCity 60-Second System (Use It Every Morning)
This is the rule that stops the day from drifting:
Pick ONE cluster → pick ONE anchor → add ONE nearby add-on → set ONE exit trigger.
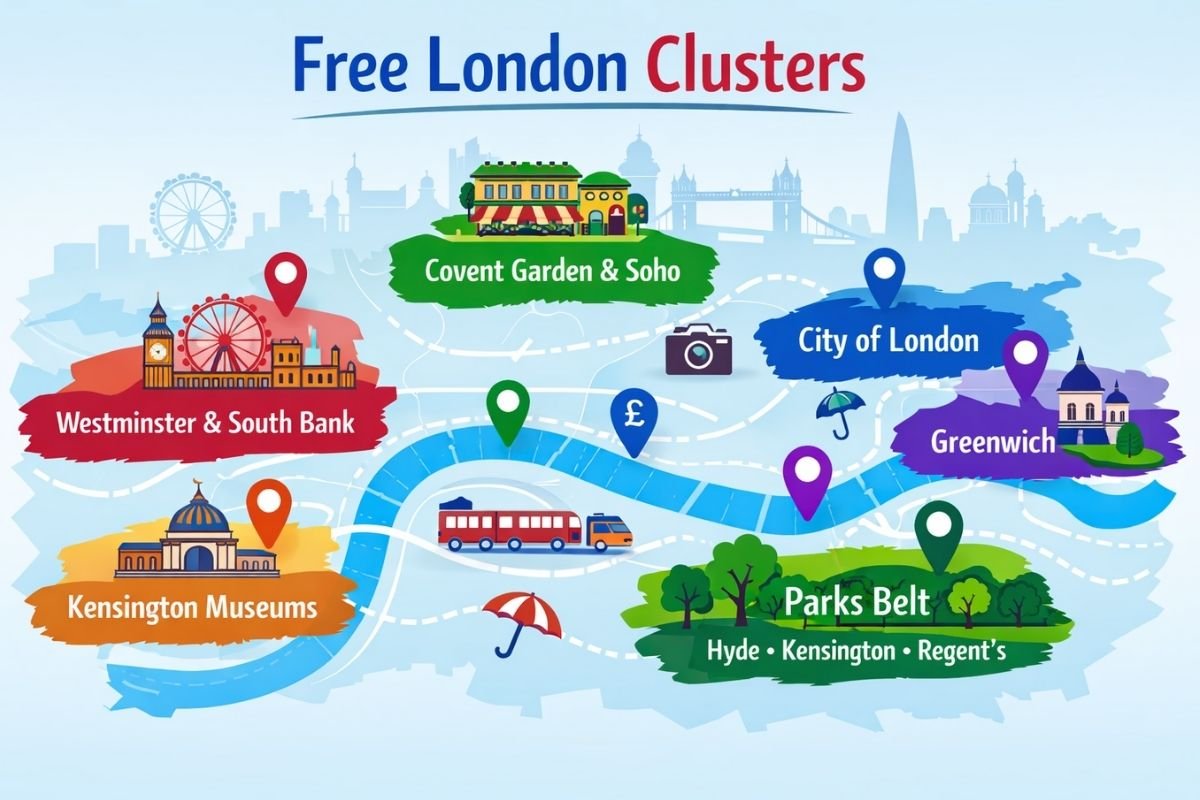
Step 1 — Pick ONE cluster (no negotiation)
Use these clusters as “one-area days”:
- Cluster A: Westminster & South Bank (icons + river walk + Tate Modern option)
- Cluster B: Covent Garden & Soho (street energy + lanes + central museums nearby)
- Cluster C: Kensington Museums (rain-proof free culture zone)
- Cluster D: City of London (history + markets + free skyline views if booked)
- Cluster E: Parks Belt (reset day that protects the rest of your trip)
- Cluster F: Greenwich (space + views + slower tempo—only if you commit)
Step 2 — Pick ONE anchor (the thing you build around)
An anchor is not “a list of stops.” It’s the thing you’re willing to do even if the weather shifts.
Step 3 — Add ONE nearby add-on (only if it’s frictionless)
If it requires a long queue gamble, tricky timing, or cross-city movement, it’s not an add-on—it’s a second anchor (and that breaks the day).
Step 4 — Set ONE exit trigger (the rule tourists never have)
- If a queue looks 30+ minutes and you’re not emotionally committed → pivot inside the same cluster.
- If rain becomes steady → switch to an indoor anchor in the same cluster.
- If energy drops (kids, jet lag, feet) → end cleanly instead of forcing “one more thing.”
Pick Your Cluster Fast (Mini Decision Table)
| Your situation | Pick this cluster | Why it works |
|---|---|---|
| First time, want icons without tickets | Westminster & South Bank | Maximum “London feeling” per minute |
| Rain / tired / family pacing | Kensington Museums | Free indoor depth with pivot options |
| Central energy + lanes + quick culture | Covent Garden & Soho | Works as a tight loop, not a sprawl |
| Calmer London + skyline logic | City of London | Historic streets + markets + booked free views |
| You need a recovery day | Parks Belt | Resets your body so tomorrow works |
| You want space + viewpoint payoff | Greenwich | Worth it only as a committed half-day |
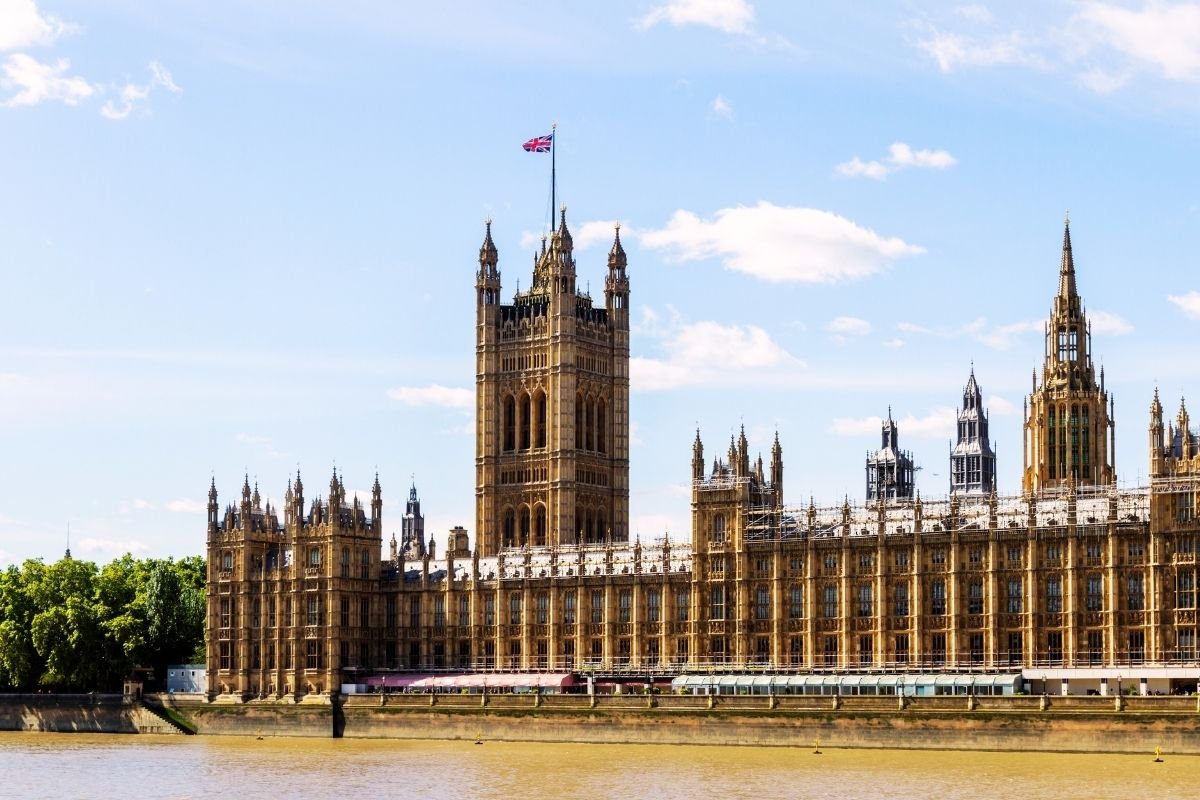
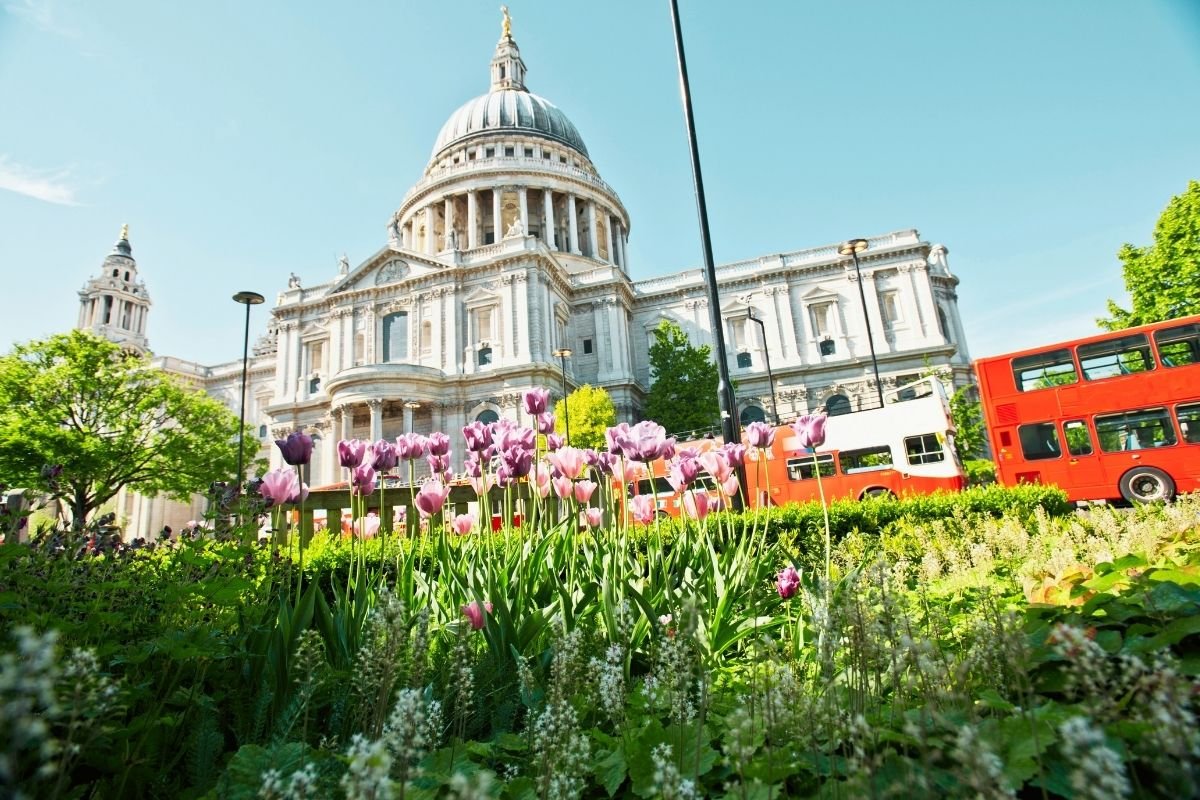
Cluster A: Westminster & South Bank (The Iconic Free Loop That Stays Controlled)
This cluster is your best first-timer win because it gives you the “postcard London” feeling without entry tickets.
The mistake is trying to “enter everything.” The win is sequencing outdoor icons + one river loop so London doesn’t eat your time.
Anchor Options (Choose ONE) — with nearest station
- 1) Westminster Bridge icon run (Westminster) — Big Ben / Houses of Parliament exterior + bridge views, done fast and clean.
- 2) South Bank riverside walk (Waterloo) — the “London atmosphere” stretch: river, skyline, street life, no ticket pressure.
- 3) Tate Modern (free collection) (Southwark / Blackfriars) — indoor pivot if weather turns, plus river views outside.
- 4) Trafalgar Square quick hit (Charing Cross) — classic central square energy without paying anything.
- 5) St James’s Park reset (St James’s Park) — the calm counterweight when crowds start pushing your mood.
TripsCity rule: You choose one anchor and protect it. Everything else becomes optional.
A free day that stays free: one controlled river loop (Westminster → South Bank) that avoids scattered detours and keeps transport taps low.
The 2–3 Hour Westminster & South Bank Plan (Realistic Timing)
Start point: Westminster Station (simplest) OR St James’s Park Station (calmer).
0:00–0:35 — Westminster exterior icons (Big Ben / Parliament views). Move with intention. Don’t “hover into drift.”
0:35–1:05 — Cross once. Commit once. (This single rule prevents the classic tourist failure: crossing, re-crossing, then spending the day “repairing” distance.)
1:05–2:20 — South Bank walk: this is your highest value-per-minute segment. It feels premium because the skyline does the work for you.
2:20–3:00 — Clean exit: end on purpose. Either one bus move, or one Tube move—then stop again. Don’t chain transfers “because you still have time.”
Optional add-on (choose ONE, nearby): If weather turns, step into Tate Modern (free collection) instead of trying to “save” the day with a far detour. Same cluster. Same day saved.

South Bank is the rare London win: landmark atmosphere with zero entry fees—if you keep the route controlled and avoid cross-city repairs.
Transport Numbers That Decide Whether Your “Free Day” Stays Free (2026)
Here’s the honest baseline: on a “free attractions” day, you mostly pay for moving.
So your strategy is not “walk everywhere.” Your strategy is: stay inside one cluster so you move less.
| Item | What it changes in your plan | Adult price |
|---|---|---|
| Bus/Tram Hopper fare | Cheap one-hour window for short moves (saves feet) | £1.75 |
| Bus/Tram daily cap | Your ceiling for a bus-heavy day | £5.25 |
| All-day PAYG cap (Zones 1–2) | Typical “controlled central day” ceiling | £8.90 |
| All-day PAYG cap (Zones 1–6) | What happens when your day spreads too wide | £16.30 |
Source: TfL bus & tram fares + TfL fare capping (last checked Feb 2026).
If you want the mistake-proof logic (Oyster vs Contactless, caps, and the small errors that inflate taps), use this internal guide:
London transport costs (daily caps + common mistakes)
Free Views That Require Booking (Practical, 2026)
Two of London’s most valuable “free views” are free in money but strict in access.
If you treat them like casual walk-ins, you waste time and mood. Here’s the practical version:
Sky Garden (free, timed) — how it really works
- How to get in: book a free ticket with a time slot (spaces are limited).
- How far ahead: tickets are typically available up to 3 weeks in advance.
- Time reality: your ticket is valid for your slot and visits can be limited to around 1 hour after entry time (unless you have a separate reservation).
Walk-in reality: Sky Garden may accept free walk-ins during public hours, but it’s not guaranteed—treat walk-ins as a bonus, not an anchor.
Luggage rule (important): Large bags and suitcases are not permitted. Airport-size hand luggage is allowed only if it fits through X-ray screening (max 615 × 410mm).
Horizon 22 (free tickets) — the “release time” rule
Ticket release rule (official): Tickets are released every Monday at 10:00am for the following 14 days — source: Horizon 22 tickets.
Walk-in reality: there can be limited walk-in availability on the day, but do not build your plan around “maybe.”
TripsCity rule: if you don’t already have a free-view slot, it’s not your anchor. It’s a bonus only.
Arrival day saver (optional booking): luggage quietly destroys viewpoint plans. If you land and want a clean first day, one luggage storage booking near your first station keeps the plan walkable:
Store luggage near Waterloo/Westminster (optional)
Deadly Mistakes That Break “Free London”
- Treating the city like a list. Lists create movement. Movement creates cost. Choose one cluster.
- Crossing the river multiple times “for a better view.” You don’t get a better day. You get a tired day.
- Building your day around a free viewpoint without a slot. That’s not planning. That’s gambling with your time.
- Trying to “save money” by walking without logic. A walk is free. A scattered walk is expensive—in energy and missed options when weather shifts.
- No rain alternative. London doesn’t need storms to break your day. Steady light rain is enough if your plan has no indoor pivot.
Funnels: The Pages That Make Free Plans Work
Free plans fail when your base is wrong, your transport logic is fuzzy, or your budget expectations are fantasy.
- London 2026 travel guide (big picture system)
- How to get around London (save-your-day transport system)
- London daily budget reality (real numbers)
Now we deal with the thing that breaks most free plans in real life:
rain + queues + decision fatigue.
Because the internet’s free lists don’t fail on ideas. They fail on sequence. They send you to great places in a way that ruins your day.
The Second Shock Truth: Free Museums Can Be the Most Expensive Places in London… in Time
London’s big free museums aren’t hidden gems.
They’re public magnets. Which means two things are always true:
- The crowd wave is predictable: late morning through mid-afternoon is the pressure window, especially on weekends and school holidays.
- “We’ll see when we get there” is not a plan: it’s a queue gamble.
TripsCity rule: when your anchor is a free museum, you build a day that survives either outcome:
- You walk in smoothly → you go deep and finish calm.
- It’s packed → you pivot to a second anchor in the same cluster, not across the city.
Cluster C: Kensington Museums (The Rain-Proof Free Culture Zone)
If you want a half-day that still feels “premium London” without paying entry tickets, this is your strongest cluster.
Why? Not because it’s famous—because it’s stable. You can switch plans without paying in transport time.
Anchor Options (Choose ONE) — with nearest station
- Natural History Museum (South Kensington) — best “wow factor” fast, especially for families.
- Victoria and Albert Museum (V&A) (South Kensington) — calmer, deeper, less noisy pacing.
- Science Museum (South Kensington) — high energy, interactive feel, can be loud.
- Serpentine Galleries (Lancaster Gate / Hyde Park) — quieter free art pivot near the park edge.
- Kensington Gardens walk reset (Queensway / Lancaster Gate) — the “save the mood” move when you’re saturated.
- Albert Memorial + Royal Albert Hall exterior loop (South Kensington) — iconic outside segment without buying a show.
- Hyde Park edge reset (bench plan) (Knightsbridge / Hyde Park Corner) — the comfort option when your feet start negotiating.
Important reality: these museums often have paid temporary exhibitions. Your free plan is still valid as long as you treat paid exhibitions as optional upgrades—not the point of the day.
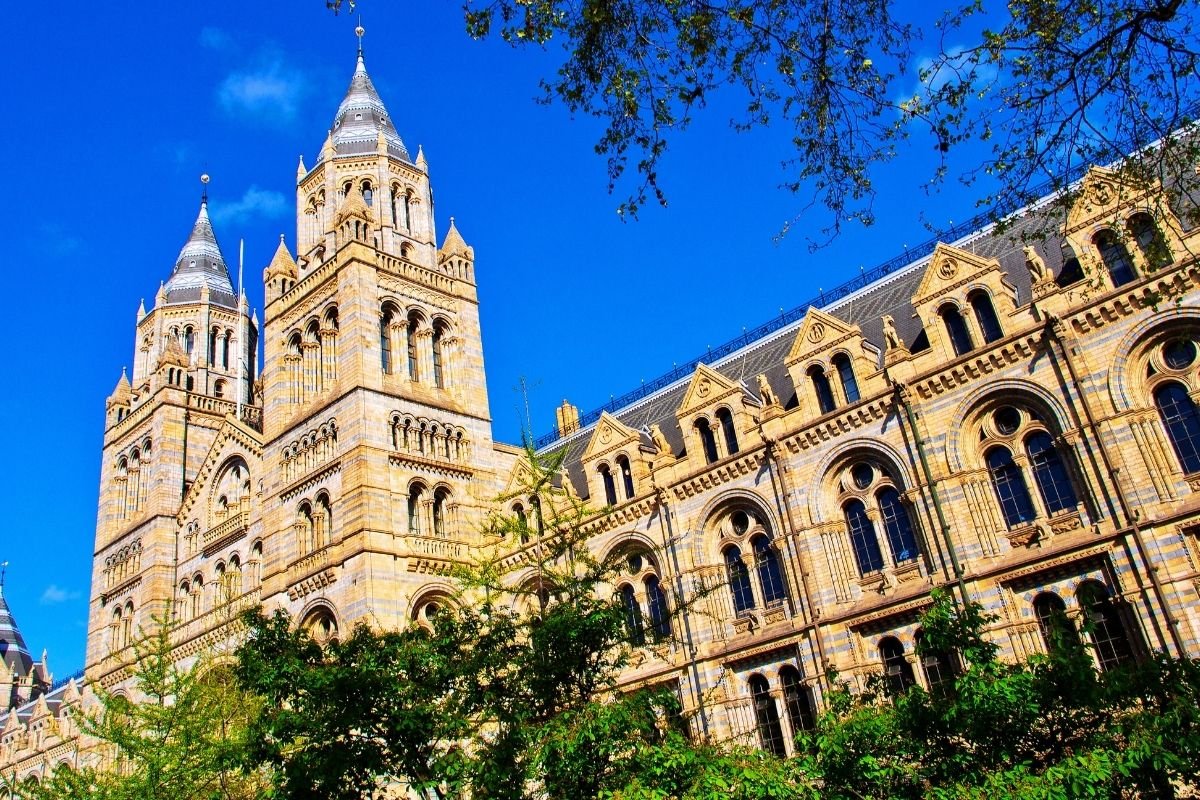
Kensington is the “free day that stays intact”: three major museums in one tight zone, so rain and queues don’t force expensive cross-city repairs.
The 2–3 Hour Rescue Plan (When you’re short on time)
- 0:00–0:15 — Arrive + stabilize: bathroom, coat, water. (Not wasted time; it prevents the mid-museum fatigue crash.)
- 0:15–1:35 — Go deep in ONE museum (don’t skim three). Choose based on your travel type:
- Families: Natural History first (fast “wow”).
- Couples: V&A first (calm depth).
- Comfort seekers: choose the museum that feels least crowded at the door, not the one you “should” do.
- 1:35–2:10 — Reset segment (non-negotiable): sit, snack, breathe. This protects the rest of the day.
- 2:10–3:00 — Add ONE nearby add-on only if energy is still strong:
- a second short museum wing, or
- a 20-minute garden-edge walk if weather allows.
The Half-Day That Feels Complete (Rain-Proof)
- 0:00–1:45 — One museum properly (depth beats distance).
- 1:45–2:15 — Indoor reset (you’re preventing decision fatigue).
- 2:15–3:30 — Second anchor inside the same cluster (V&A is the best “calm finish” for many travelers).
- 3:30–4:00 — Clean exit: one move only (bus or Tube), then stop again.
Queue rule that saves your mood: if the entrance hall feels packed and you’re already irritated, you don’t “push through.” You pivot to the calmer museum next door. Same area. Same day saved.
Cluster B: Covent Garden & Soho (Free Central Energy + Free Culture Anchors Nearby)
This cluster is where tourists go when they want London to feel alive.
It’s also where tourists lose control—because the area encourages wandering, and wandering is how “free” becomes scattered.
The fix is a tight loop with named anchors and indoor escape points.
Anchor Options (Choose ONE) — with nearest station
- Covent Garden Piazza + Market buildings (Covent Garden) — street atmosphere + covered moments when weather shifts.
- Seven Dials → Neal’s Yard micro-loop (Covent Garden) — quick “London lanes” texture without distance.
- Trafalgar Square + National Gallery (free entry) (Charing Cross) — the cleanest central free culture anchor.
- British Museum (free entry) (Tottenham Court Road / Holborn) — high-value culture anchor if you commit (not a rushed add-on).
- Chinatown → Leicester Square short loop (Leicester Square) — strong atmosphere, but crowd-sensitive.
- Soho lanes (Carnaby / side streets) as a controlled walk (Oxford Circus / Tottenham Court Road) — works best earlier in the day.
- Piccadilly Circus “one-photo then move” rule (Piccadilly Circus) — iconic moment, not a place to linger.
National Gallery note: General admission is free, but advanced booking is recommended for smoother entry—especially at peak times.
Reality note: This cluster is crowded by design. Your goal is not to “avoid people.” Your goal is to move through the energy with control, then exit before it becomes friction.
Covent Garden & Soho works when it’s a loop, not a drift: one anchor, one nearby add-on, and an indoor escape so rain and crowds don’t hijack the plan.
The 2–3 Hour Central Loop (Works in mixed weather)
- Start: Covent Garden Station or Charing Cross (choose the closest to your base).
- 0:00–0:35 — Covent Garden atmosphere segment (pacing rule: sample, don’t camp).
- 0:35–1:05 — Lanes micro-loop (Seven Dials / Neal’s Yard). Your win is texture without distance.
- 1:05–1:25 — Transition to Trafalgar Square (short, straight).
- 1:25–2:25 — National Gallery as your rain-proof culture anchor (free entry). This is your “indoor rescue” that doesn’t feel like a compromise.
- 2:25–3:00 — Clean exit: end near a station and leave once. Don’t chain “one more area” unless it’s within 10–12 minutes on foot.
The Half-Day “Free Culture” Version (For people who want depth)
This is for travelers who want one serious free museum anchor without turning the day into a marathon.
- Plan A: British Museum as the anchor (commit 90 minutes minimum).
- Plan B: National Gallery as the anchor (calmer flow, central finish).
TripsCity warning: do not pair British Museum + Kensington Museums in the same half-day “because both are free.” That’s how you lose time to movement and arrive at the second place already tired.
Free Planning by Traveler Type (So You Don’t Copy the Wrong Day)
Couples
Your biggest mistake is over-walking “because it’s romantic.” London becomes romantic when you’re not exhausted. Choose one anchor (National Gallery or a tight Covent loop), then exit cleanly and save your evening energy.
Families
Your biggest mistake is an outdoor-only plan in uncertain weather. Kensington Museums is your safest free half-day because it has bathrooms, indoor space, and pivot options without commuting across the city.
Budget travelers
Your biggest money leak is not entry fees. It’s scattered transport. Keep the plan inside one cluster and avoid big zone jumps. Your “free day” should behave like a Zones 1–2 day, not a “let’s see everything” day.
Comfort seekers
Your biggest mistake is refusing any small friction-remover. A single optional tool can protect the day. Keep it minimal and functional.
- Arrival day saver: luggage storage near your first anchor station (so your free plan stays walkable).
- Navigation saver: an eSIM so wrong exits don’t become 20-minute repair walks.
Optional tools (keep it clean):
Luggage storage near central stations (optional)
UK eSIM for maps (optional)
Deadly Mistakes (Museum + Central London Edition)
- Skimming three museums in one half-day. You lose time to entrances and navigation, and you leave with “we did a lot” fatigue but no real memory.
- Turning a central loop into a drift. Covent/Soho feels like it’s “all next door.” That’s how people accidentally walk a marathon and end up irritated.
- Ignoring crowded-area safety basics. Crowds are where small mistakes happen: phones in back pockets, bags open on trains, distraction moments.
- Building “free days” on a weak base. If your hotel base is poorly connected, free clusters become stressful.
If you want calm safety rules (metro, crowds, night movement), keep this internal page open:
London safety rules (2026)
And if you want a base that makes one-area days easy:
Where to stay in London (2026)
Tonight’s 60-Second Decision (So Tomorrow Doesn’t Drift)
- Pick tomorrow’s cluster: Kensington Museums or Covent/Soho (not both).
- Choose ONE anchor by name: Natural History or V&A or National Gallery or British Museum.
- Choose ONE nearby add-on: Serpentine / lanes loop / short square moment (10–15 minutes away).
- Choose ONE exit trigger: queue pressure, rain, fatigue.
That’s how your day stays free in the way people actually mean: not “free entry,” but free from repairs.
By now, you’ve seen the core TripsCity truth:
London isn’t hard because it’s expensive. London is hard because it’s easy to drift.
is for the days tourists often waste:
- The “we already did the icons” day
- The “we want something calmer” day
- The “we’re tired but still want London” day
This is where random free lists destroy you—because they pull you into distant detours and your “free day” becomes a transport-and-fatigue day.
The Third Shock Truth: Parks Aren’t Filler — They’re Your Reset System
Most visitors treat parks as optional scenery.
That’s why their trip collapses mid-week.
Parks are not wasted sightseeing time. They’re how you stop the afternoon from turning into:
“We’re tired → we make bad choices → we pay for fixes.”
So this part is built around three calmer clusters that actually function as plans:
- Cluster D: City of London (historic streets + skyline logic + markets + free views if booked)
- Cluster E: Parks Belt (Hyde/Kensington/Regent’s style reset day that protects the week)
- Cluster F: Greenwich (space + views + slower tempo — only if you commit)
The Full Decision Table (Keep This Open While You Plan)
| If you want… | Choose this cluster | Best anchor (by name) | Exit trigger (the day-saver) |
|---|---|---|---|
| Icons + river atmosphere without tickets | Westminster & South Bank | Westminster Bridge run OR South Bank walk | If crowds feel “stuck” → keep moving, don’t hover |
| Rain-proof free culture | Kensington Museums | Natural History OR V&A | If entrance is packed → pivot next door |
| Central energy + quick culture | Covent/Soho | National Gallery OR Covent loop | If it turns shoulder-to-shoulder → indoor reset then exit |
| Calmer “grown-up London” + skyline logic | City of London | St Paul’s exterior loop OR St Dunstan garden pocket | If you’re rushing for a booking window → cut the loop short |
| Recovery day that protects your week | Parks Belt | Hyde Park / Kensington Gardens long walk | If feet/energy drop → bench + end cleanly |
| Space + viewpoint payoff | Greenwich | Greenwich Park viewpoint | If travel time feels heavy → don’t stack anything else |
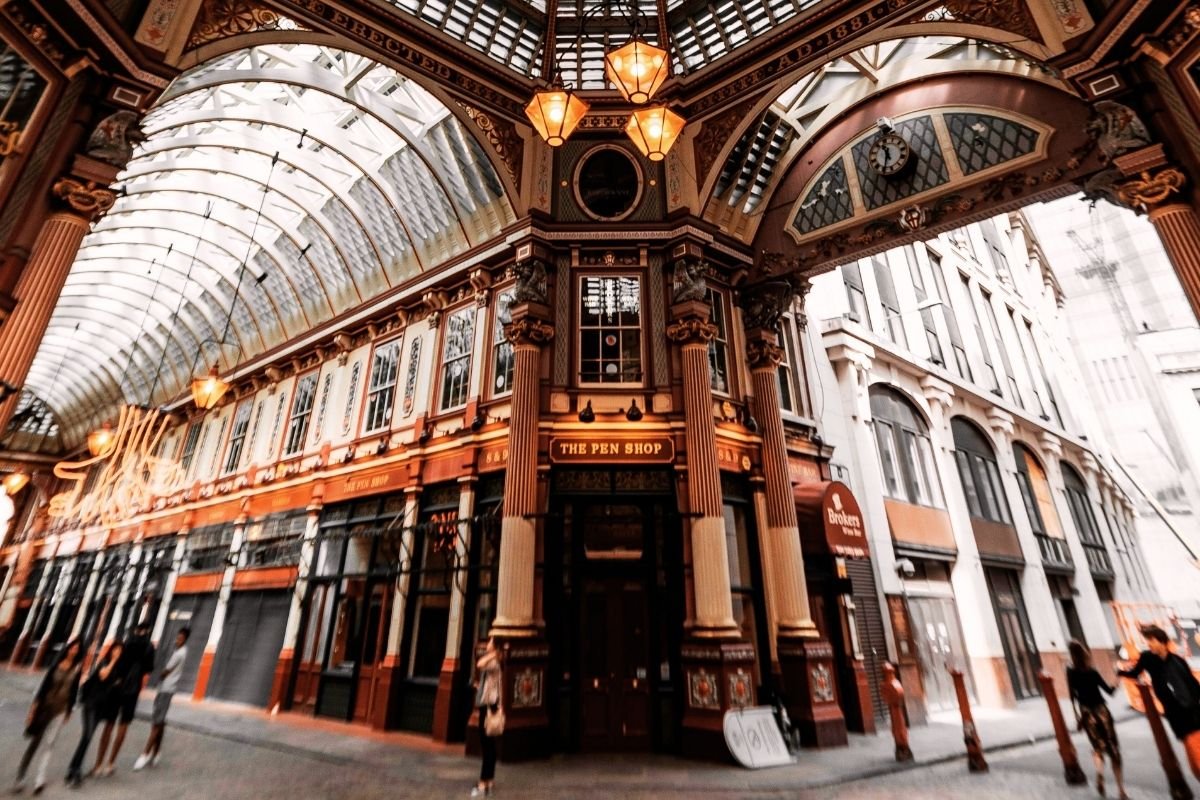
Cluster D: City of London (Calm History + Skyline Without Ticket Pressure)
This is the antidote to tourist chaos.
City of London works because it gives you texture—old lanes, hidden gardens, markets, and skyline contrasts—without requiring a paid attraction day.
The risk is trying to add a “free view” without a booking and then losing an hour to waiting. City becomes powerful when you treat views as bonuses, not anchors.
Anchor Options (Choose ONE) — with nearest station
- 1) St Paul’s Cathedral exterior loop (St Paul’s) — iconic outside moment + controlled walking start.
- 2) Millennium Bridge → Tate Modern (free collection) pivot (St Paul’s / Blackfriars / Southwark) — a clean river-to-culture line without ticket pressure.
- 3) Leadenhall Market (browse only) (Monument / Bank) — covered historic atmosphere (best as a short stop, not a “day”).
- 4) St Dunstan-in-the-East Garden (Monument) — one of the calmest “free London” pockets in the City.
- 5) Barbican Conservatory (free, limited access) (Barbican) — indoor green pivot, but only if you follow the booking rule.
Barbican Conservatory reality: Free entry, but access is limited. Tickets are released one month in advance online, with a small number of day tickets released at 9:30am on open days.
TripsCity reality: the City feels “free and elegant” only when you keep it tight. If you try to stitch it to far clusters, you turn it into a commute day.
City Loop (2–3 Hours) — The Calm, High-Value Version
- Start: St Paul’s station (or Bank if that’s closer to your base).
- 0:00–0:25 — St Paul’s exterior moment (quick, purposeful).
- 0:25–0:55 — One controlled lane segment (texture, not distance).
- 0:55–1:25 — A calm pocket stop (St Dunstan is ideal when you want your nervous system back).
- 1:25–2:10 — Covered market atmosphere (Leadenhall browse) OR a short riverside segment nearby.
- 2:10–3:00 — Optional booked free-view attempt (ONLY if you already secured a slot; otherwise you end cleanly).
Exit trigger: if you notice you’re “rushing to make something,” you cut the loop short. Rushing is how the City loses its calm payoff.
City of London is a quiet power move: history + skyline texture without entry fees—if you keep it as a controlled loop instead of a scattered chase.
Optional tool (keep it minimal): If you rely on maps and want to avoid wrong-exit “repair walks,” an eSIM can remove that friction without changing the core free plan.
UK eSIM for reliable maps (optional)
Cluster E: Parks Belt (The Free Day That Protects Your Week)
This is the cluster people skip… then regret when their legs and mood collapse on Day 4.
A parks-belt day is not “doing less.” It’s doing the thing that keeps the rest of the trip usable.
Anchor Options (Choose ONE) — with nearest station
- 1) Hyde Park long walk + Serpentine reset (Hyde Park Corner / Knightsbridge) — classic “save the nervous system” move.
- 2) Kensington Gardens loop (Queensway / Lancaster Gate) — calmer pacing, good for families.
- 3) St James’s Park “quiet icon” walk (St James’s Park) — perfect when central London is overstimulating.
- 4) Regent’s Park wide-space loop (Regent’s Park) — the “bigger sky” day when crowds feel tight.
- 5) Primrose Hill viewpoint walk (Chalk Farm) — free view, but only if your legs are still cooperative (don’t force it late-day).
Parks Belt Half-Day Plan (Built for Real Energy)
- 0:00–0:15 — Arrive and slow down on purpose. This day fails when you start it like a mission.
- 0:15–1:15 — One long walk segment (45–60 minutes) with one bench pause. The pause is part of the plan.
- 1:15–1:45 — Reset block: sit, warm up, snack, bathroom. This is how you stop fatigue spirals—especially with kids.
- 1:45–2:45 — Add ONE nearby add-on only if energy is strong: a second short loop or a calm garden corner. Keep it gentle.
Exit trigger: the first real sign of fatigue means you end cleanly. A reset day turns into a “bad day” the moment you try to squeeze “one more area.”
Weather rule: If rain is steady and your mood is already fragile, don’t force an outdoor-only day. Switch to the Kensington Museums cluster and protect your trip.
Cluster F: Greenwich (Only If You Commit — Otherwise Skip)
Greenwich is one of the best “free-feeling” areas in London because it gives you what central London often can’t:
space.
But Greenwich has a trap: it looks close on the map, so people treat it like a casual add-on.
Then the day becomes: travel time → rushed walk → quick photo → travel time.
That’s not a free day. That’s a day you lose.
Anchor Options (Choose ONE) — with nearest station
- 1) Greenwich Park viewpoint (Cutty Sark DLR / Greenwich) — the whole reason to come: commit to it.
- 2) Old Royal Naval College courtyard walk (Cutty Sark DLR / Greenwich) — big visual payoff without entry fees.
- 3) Greenwich Market browse (no spending required) (Greenwich) — good as a short covered stop, not a “shopping day.”
- 4) Thames Path riverside stroll (Greenwich) — the calm water-line moment that makes Greenwich feel different.
- 5) Cutty Sark area exterior moment (Cutty Sark DLR) — quick landmark feel without buying a ticket.
The Greenwich Half-Day Plan (The Right Way)
- 0:00–0:35 — Arrive and stabilize. Don’t rush straight into a climb.
- 0:35–1:35 — Greenwich Park slow climb + viewpoint (this is your anchor).
- 1:35–2:10 — Calm reset (bench, snack, kids reset).
- 2:10–3:20 — One nearby add-on: Naval College courtyard OR short market browse OR Thames Path segment (choose ONE).
- 3:20–4:00 — Clean exit. Do not drift into “maybe we’ll do one more thing.”
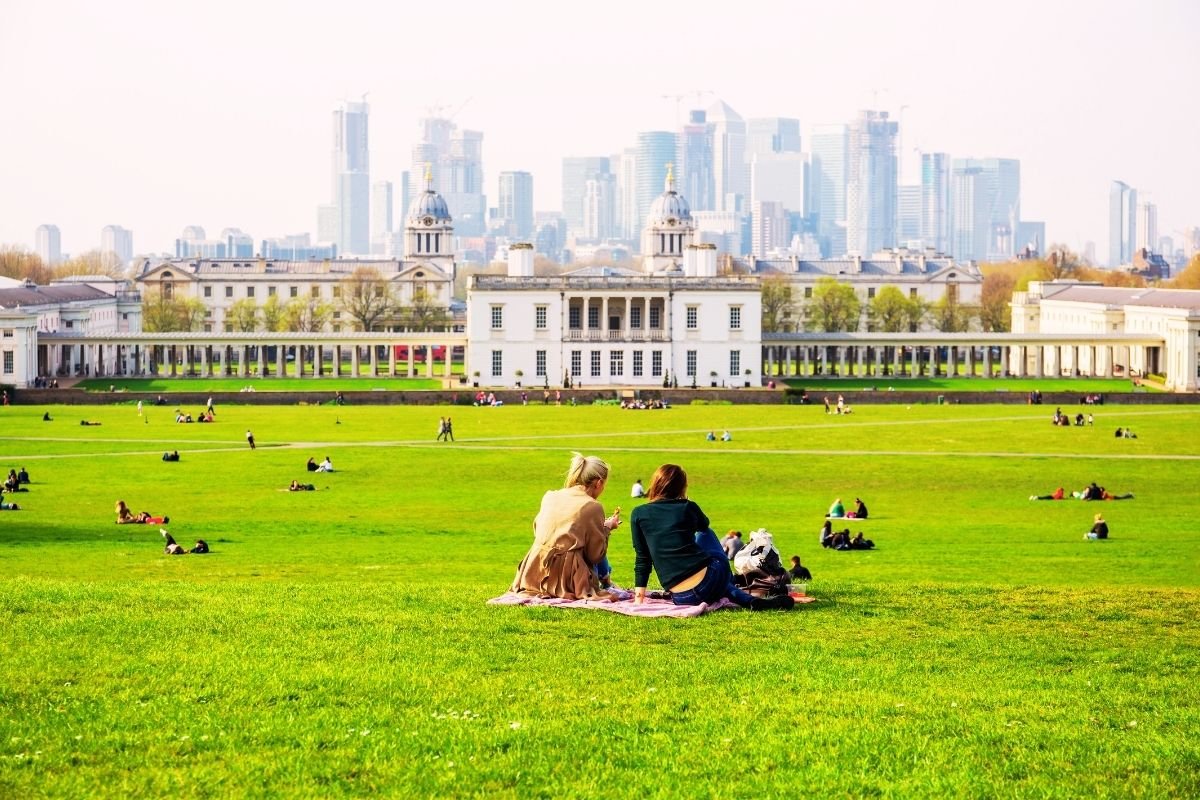
Greenwich pays off only when you commit a half-day: space, skyline, and calm pacing—without turning it into a rushed add-on.
Exit trigger: if you start checking the time and feeling pressure, you cut the add-on and leave. Greenwich is a “slow win” or it’s not a win.
Funnels That Make These Free Days Work
If your base is weak, every “free cluster” becomes stressful.
If your transport logic is fuzzy, your free days become tap-heavy.
If your budget expectations are fantasy, you end up paying for fixes.
Use these internal anchors to keep everything coherent:
- Complete London travel guide (system view)
- How to get around London (simple transport system)
- Is London expensive? (honest reality)
- Best areas to stay (first-timers)
Optional booking (keep it clean): If you’re still choosing a base, place one hotel search link once (not everywhere), and filter by “walk to Tube” so clusters stay easy.
Find a hotel near a well-connected station (optional)
FAQ (Practical, No Fluff)
Are London museums really free?
Many major museums have free entry to their permanent collections, but some special exhibitions are paid. The bigger issue is time: crowds and capacity can create long waits, so the best approach is to choose one museum anchor and keep pivots inside the same cluster.
What is the best free plan if we only have 2–3 hours?
Pick one cluster and one named anchor: Westminster/South Bank loop for icons, Kensington (Natural History or V&A) for rain-proof culture, or City of London (St Paul’s exterior loop) for calm texture. Then end cleanly instead of drifting into a second area.
How do we avoid “free” places that cost us the day in queues?
Never build the day around something uncertain. If a queue looks like a 30+ minute commitment and you’re not emotionally committed, pivot to your nearby add-on in the same cluster and keep moving.
Is Greenwich worth it for tourists?
Yes—if you commit a half-day. If you treat it like a quick add-on, travel time eats the payoff and you leave feeling rushed.
Can we do multiple clusters in one day to see more for free?
You can, but it usually makes the day worse. The cost is not tickets—it’s movement, wrong exits, fatigue, and transport taps. Go deeper in one cluster instead of jumping across the city.
What’s the cleanest decision to make tonight?
Choose tomorrow’s cluster (one area), choose one anchor by name, choose one nearby add-on, and set one exit trigger (queue, rain, or fatigue). That’s the difference between a free London itinerary and free chaos.
The Direct Decision (No Sugarcoating)
If you came here for free attractions in London, you weren’t hunting freebies.
You were hunting a day that doesn’t collapse.
So here’s the decision you need to make:
Tomorrow, pick ONE cluster and run it properly.
Don’t chase ten free spots. Don’t zig-zag across the map. Don’t “repair” the day with distance.
Choose one anchor, one add-on, one exit trigger—and London finally feels generous instead of expensive.